Often a program is written to solve a problem which may be very complicated. So it is necessary to analyze the problem and to divide it into simplier and more elementary problems. Subroutines allow the programmer to separate the program into smaller parts which are easier to solve. A subroutine can be called many times in the same program, thus avoiding to repeat the same code at various places in the program.
The purpose of the program built in this chapter is to have the robot go to the ground center tile, for any initial position or direction. This program will be divided into subroutines.
* Robot position :
In a program, the robot position is indicated by the two keywords xRobot and yRobot. During the program execution, xRobot and yRobot have the values x, y corresponding the tile occupied by the robot.
* Robot direction :
In a program, the robot direction is indicated by the two keywords dxRobot and dyRobot. Their values are equal to the variation of xRobot and yRobot when the robot moves to the next tile ahead :
- if the robot faces the right of the ground : dxRobot is 1 and dyRobot is 0
- if the robot faces the left of the ground : dxRobot is -1 and dyRobot is 0
- if the robot faces the front of the ground : dxRobot is 0 and dyRobot is 1
- if the robot faces the rear of the ground : dxRobot is 0 and dyRobot is -1
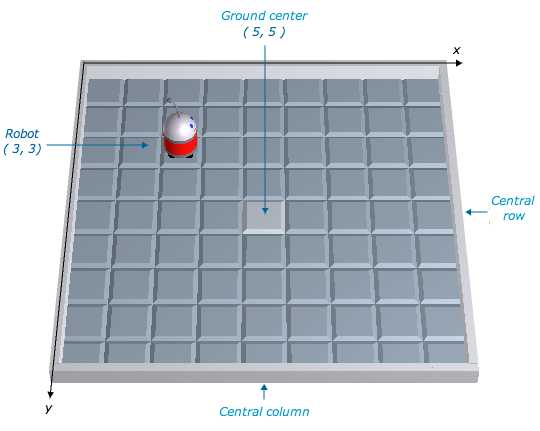
The only possible values of dxRobot and dyRobot are 0, 1 and -1. One of the values is 0 the other is not 0. For the example shown in the above picture dxRobot is 1 and dyRobot is 0
It is possible to add or remove walls inside the ground, the walls surrounding the ground may not be removed. Some program purposes are more challenging when the ground contains inner walls.
Now, you are going to built the ground which will be used in this tutorial.
It is the ground shown above
- Choose the Ground > Modify menu. The ground modification window appears.
- Choose the Ground > New
menu to create a new ground. The ground parameters window appears.
- Select a width and a depth of 9 tiles and click OK button to validate.
- Click Robots button then click + button below : a new robot appears on the ground.
- Click tile of coordinates 3,3 to set the initial robot position (used when the execution begins)
- Click
Tiles button, then click tile of coordinates 5,5. The color of this tile becomes lighter. This tile is the center of the ground.
- Click on Use this ground button to close the ground modification window. Now, if you display the ground with the Window > Execution window menu, you see the new ground.
* Here, you are going to build a subroutine to turn the robot towards the left of the ground.
* Subroutines are available at level 2. The current level is shown in the tools palette.
In case the current level is 1, choose Configuration > Level menu and select level 2.
If the program window is not empty, close it and choose File > New program menu
* To create a new subroutine, choose Programming > New subroutine menu. The new subroutine takes the place of main program and is now displayed in the program window.
* Subroutine name : each subroutine is identified by the name you assign to it. By default, when the subroutine is created, it gets the name Subroutine1. Replace this name by TurnTowardsGroundLeft
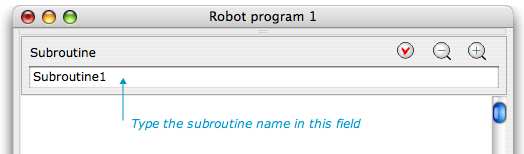
A subroutine name may contain letters and digits but no space and must begin with a letter. Its maximum length is 32 characters. It must be different from the robot language keywords.
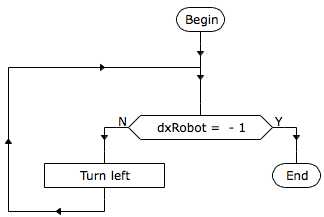
* Build the TurnTowardsGroundLeft subroutine flowchart :
A subroutine flowchart is built the same way as the main program flowchart. It must contain one and only one begin block and at least one end block.
Here, the flowchart contains the keyword dxRobot. When the robot is facing left, dxRobot value is -1.
If dxRobot is different from - 1, we rotate the robot by 90° then we redo the test.
Following elements are created subroutines. Click any element of the list to display its flowchart.
* When a subroutine is displayed, you can also click Main button to show main program.
* A subroutine is executed when it is called from main program or a subroutine. This is done by inserting a subroutine call block into the flowchart.
In order to test the execution of TurnTowardsGroundLeft subroutine, build the main program containing the subroutine call :
- display main program
- build the following flowchart :
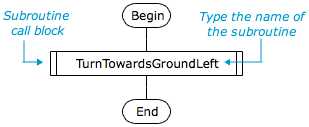
* Subroutine execution : a subroutine call block execution causes the execution of the subroutine begin block, then the subroutine is executed until its end block, then the execution continues at the block following the subroutine call block.
- Initialize the program (choose Execution > Initialization menu or click INIT button)
- Run the program.
- After execution, click the robot to change its initial direction, run again the program : in any case, the robot faces left of the ground when the program end
* The ground center is at the intersection of the central column and the central row (see the ground).
In order that the robot
goes to the ground center, it has to go to a tile in central column, then to a tile in central row. To achieve that purpose, we need two subroutines.
* GoToCentralColumn subroutine :
- Create a new subroutine with the name GoToCentralColumn
- Build following flowchart :
This subroutine method is similar to the previous one, except we have to test the robot y position, and we move it towards front or rear of the ground.
- Build new subroutines named TurnTowardsGroundRear and TurnTowardsGroundFront.
- Build new subroutine named GoToCentralRow
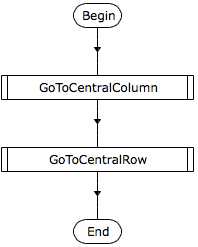
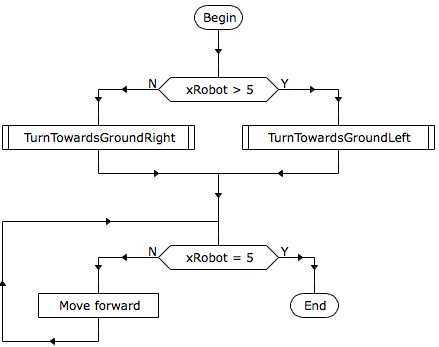
- Build the main program :