* In this chapter, you are going to make the robot draw a square with a side of 5 tiles. To draw a mark on a tile, the robot uses the instruction Mark . After marking a tile, the robot has to move and turn if necessary to mark the next tile. The number of marks to be drawn is 16 : the robot has to move and draw a mark 16 times and turn 4 times at each square corner. So the program will contain at least 36 blocks. This is really too much, most of the blocks are the same because the same action has to be repeated many times. And in case you want to draw a larger square, you have to change the whole program. So the solution is to use loops to repeat a part of the program.
A loop is represented by a loop block where it is possible to insert the blocks to be repeated.
- Open a new program and select level 5
- The program purpose is to draw a square, so you can select this purpose in the header of the program window
- Change the ground : select Ground > Modify menu, then Ground > Open menu, select the ground named Ground9x9.bog in Files folder of the tutorial, then click button Use this ground
Now, you are going to write a subroutine to draw one side of the square.
- Choose Programming > New subroutine.
- Give the name
DrawSide to the subroutine
- Build the following flowchart :
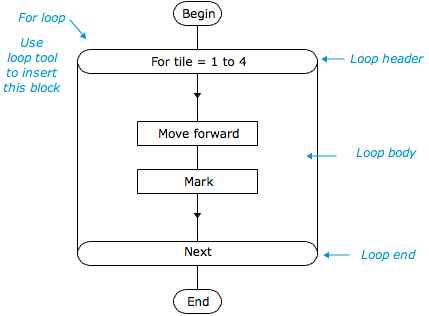
* The loop header contains the instruction : For tile = 1 to 4
- For and to are mandatory keywords in this instruction.
- tile is a variable, used here as the loop variable.
- 1 is the loop variable initial value and 4 is the final value ; those values may be numbers or numerical expressions.
* Execution progress :
- When the loop is executed for the first time, the loop variable is set to its initial value : here, tile is set to 1
- Then the loop body (flowchart inside the loop) is executed : here the robot moves ahead and draws a mark.
- Then the instruction Next is executed : it provokes the execution to continue at the loop header, that is for the next variable value.
- When the loop header is executed for the second time, the loop variable value is increased by 1 ; here the tile value becomes 2
- Then the loop boody is again executed, then the instruction Next etc ... until the variable value becomes larger than the final value. Here, the loop will end when tile has the value 5
-
After the loop end, the execution continues at the block following the loop block.
* In order to test this subroutine, you can insert in the main program a begin block, a subroutine call and an end block, and run it.
The first executed block in the loop body is the one linked to the loop header
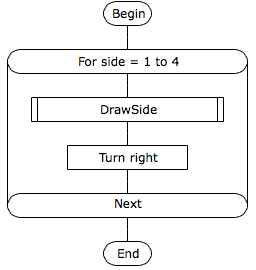
In order to draw a square,we have to draw a side and turn, this being repeated 4 times. So we use again a loop to draw the square.
- Display main program and build the following flowchart :
Rectangle sides are not all of equal length. It is possible to change the subroutine DrawSide to draw a side the length of which is stored in a variable before subroutine call.